Revolve Manual
First use
Before first use please make sure to clean your stem thoroughly with isopropyl alcohol to remove every residue from the machining and coating process. Soak the parts and wipe it off with a tissue on the outside, use a pipe cleaner or Q-tip on the inside. This is especially important with the coloured, PVD finishes.
Airflow control

With DRC Airflow Tube (Standard)
|
|
Fresh air is drawn into the airport and through the centre before mixing with the vapour and passing over the helix. |
|
|
The air intake is directed straight to the mouthpiece for a blast of cool air that bypasses the cooling spiral entirely. |
|
|
No added fresh air provides denser clouds while maintaining decent cooling. Perfect for those mouth to lung pulls.
|
Please refer to the DRC Airflow slideshow to see the airflow path within the Revolve for the specific options.
With Direct Airflow tube
|
|
Air intake is directed to the mouthpiece for a blast of fresh air while the vapour heads through the centre. |
|
|
Fresh air is drawn around the helix to cool the body and the inner tube before mixing with the vapour, then travels through the centre to the mouthpiece. |
|
|
Airport is closed for a hotter, more direct vapour experience. |
Please refer to the Direct Airflow slideshow to see the airflow path within the Revolve for the different options.
Airport Control

When using the OPEN or BYPASS mode you can control the maximum air intake with the help of the precision airport. Leave it open or dial it down to restrict the air intake for a hands-free experience.
Draw resistance control (DRC)*

To fully open, align the middle groove with the OPEN symbol. Twist to either side to increase the draw resistance.

Hold the Cap by the sides of the Digger-Outer and slide it into the grooves on the top of the Airflow Tube - you can optionally use a flathead screwdriver or your nails. Adjust the resistance by turning to either side. For the best experience use this feature with the CLOSED setting to further reduce the airflow.
*This feature is not available with the Direct Airflow Tube.
Reclaim Catcher Mesh
For extra filtration use the included mesh screens. To insert push the screen down (you can use the head of the Airflow Tube) so it lies on the two posts at the end of the cooling unit. Make sure that after installation it is away from the Tip and not touching it. Rotate the cooler to flatten and set the mesh in place.
Replace or clean regularly for the best experience.


Pro tip - When the screen is full you can place the whole thing in your next bowl for a cheeky reclaim bonus.
Spinning mouthpiece

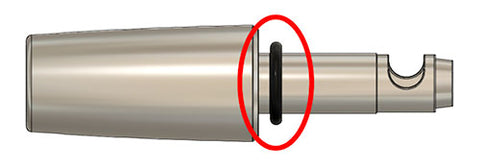
Spinning mode: Remove the o-ring completely from the Airflow Tube OR place it below the mouthpiece's cavity as shown above to store it for on the go.
To remove it try to pinch and push the o-ring off sideways with your fingernail until it begins to rise up out of the groove.

"Locked" mode: Pull out the Airflow Tube from the Mouthpiece and place the o-ring into the groove as shown above. The o-ring will create friction on the inner side of the mouthpiece in order to stop it from spinning freely.
Additional information
-
The mouthpiece is compatible with 10mm waterpieces.
-
If the cooler helix is difficult to turn or remove from the body then try warming it up with another session, heat can help loosen the build-up.
-
If you use the reclaim catcher mesh and clean or replace it regularly you can greatly reduce the maintenance needs of every other part in the stem.
- The glass body might leak some air on Closed setting due to glass tolerances.
-
NEVER try to move the tip side-to-side when removing it from the glass body, it might break it, even the slightest movement may crack the glass (quartz). Only pull and twist. If tip is too tight, try either by warming the area a bit (e.g. having a session, torching a bit) or soaking the glass with the tip in ISO or warm water for some minutes, then pull and twist.
- The 4th icon on the adjustment ring resembles the "Dual Helix" cooling path. We might have different style coolers in the future so this can help identify it.
Cleaning Instructions
We recommend that you only remove the cooling unit from the body for cleaning purposes. Do not remove the o-rings when cleaning the stem, they are isopropyl alcohol safe.
Soaking Method:
Separate the Tip from the stem, slightly pull out the cooling unit until both o-rings are visible and soak it in your cleaning solution for at least 30 minutes - you can use the tube included. It’s recommended to shake the tube periodically for a thorough clean.* Drain the solution, rinse the parts with hot water and dry completely before reassembling. You can soak the Tip alongside the stem, but never submerge a Dynavap Cap in any cleaning solution.
*If you are cleaning the glass body only shake it gently to protect the glass from accidental damages.
.
.
.

